

The Ultimate Guide to Bikini Boxes: DIY Ideas, Painting Tips & Summer Storage Inspiration
Bikini boxes are one of those summer DIY trends that instantly make you think, “Wait, why didn’t I make one of these sooner?” They are cute, practical, beachy, and surprisingly easy to create, even if you do not think of yourself as crafty.
A bikini box is usually a wooden crate or storage box that you paint, decorate, and use for bikinis, towels, sunscreen, sunglasses, beach accessories, pool toys, or all the little summer things that somehow end up everywhere. Think of it as part storage solution, part summer decor, and part Pinterest-perfect DIY project.
The best thing about bikini boxes is that they can be as simple or as detailed as you want. You can make a soft coastal version with shells and white lettering, a tropical version with flamingos and palm trees, a bright poolside version with stripes and bold colors, or a rustic wooden version that feels like it belongs in a dreamy beach house.
And yes, even if your painting skills are very much “I can maybe draw a flower if no one looks too closely,” you can still make a beautiful bikini box. This guide will walk you through everything: what bikini boxes are, why they are trending, what supplies to buy, how to prep the wood, how to paint the design, how to seal it, what to put inside, and how to style it so it looks adorable.
Table of Contents
- What Are Bikini Boxes?
- Why Bikini Boxes Are Trending Right Now
- What You Need to Make DIY Bikini Boxes
- Best Wooden Crates for Bikini Boxes
- How to Prep a Wooden Crate Before Painting
- How to Plan Your Bikini Box Design
- Bikini Boxes Ideas: Design Themes to Try
- Bikini Boxes Painting: Step-by-Step Tutorial
- Painting Techniques That Make Bikini Boxes Look Better
- Cute Bikini Boxes Inspo for Different Styles
- What to Put Inside a Bikini Box
- Where to Use Bikini Boxes
- How to Seal and Protect a Painted Bikini Box
- Common Mistakes to Avoid
- Beginner-Friendly Bikini Box Design Formula
- Advanced Tips for a More Polished Bikini Box
- How Much Does It Cost to Make a Bikini Box?
- How Long Does It Take to Make a Bikini Box?
- Can You Sell Painted Bikini Boxes?
- Bikini Box Gift Ideas
- Best Phrases to Paint on Bikini Boxes
- FAQ About Bikini Boxes
- Final Thoughts
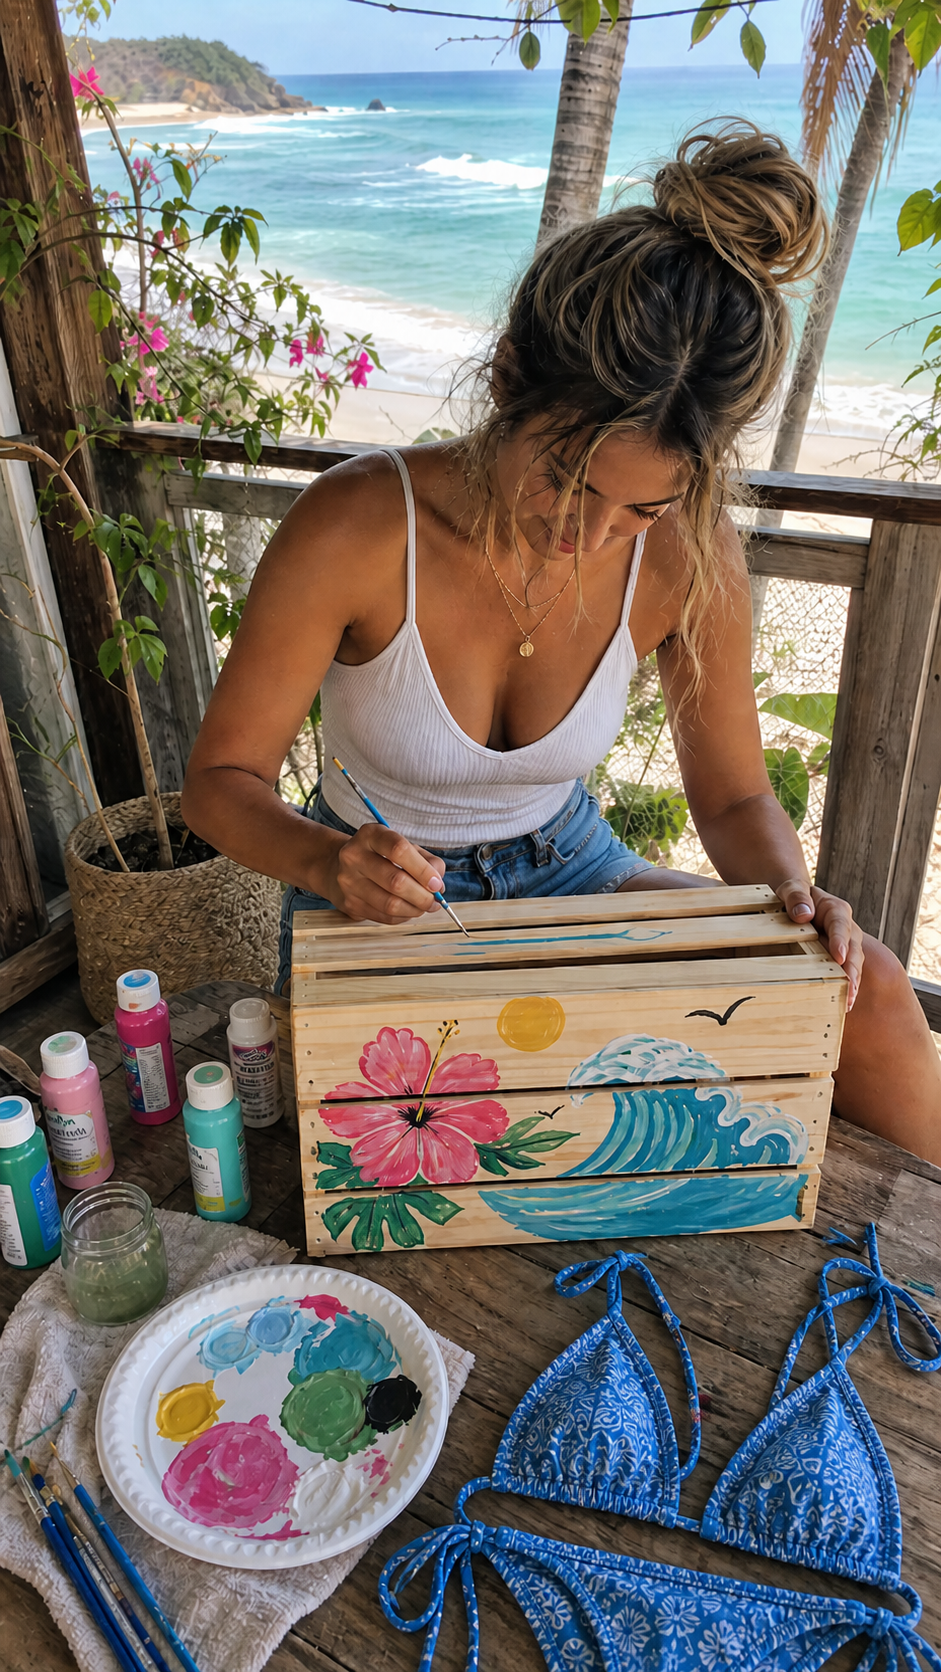
What Are Bikini Boxes?
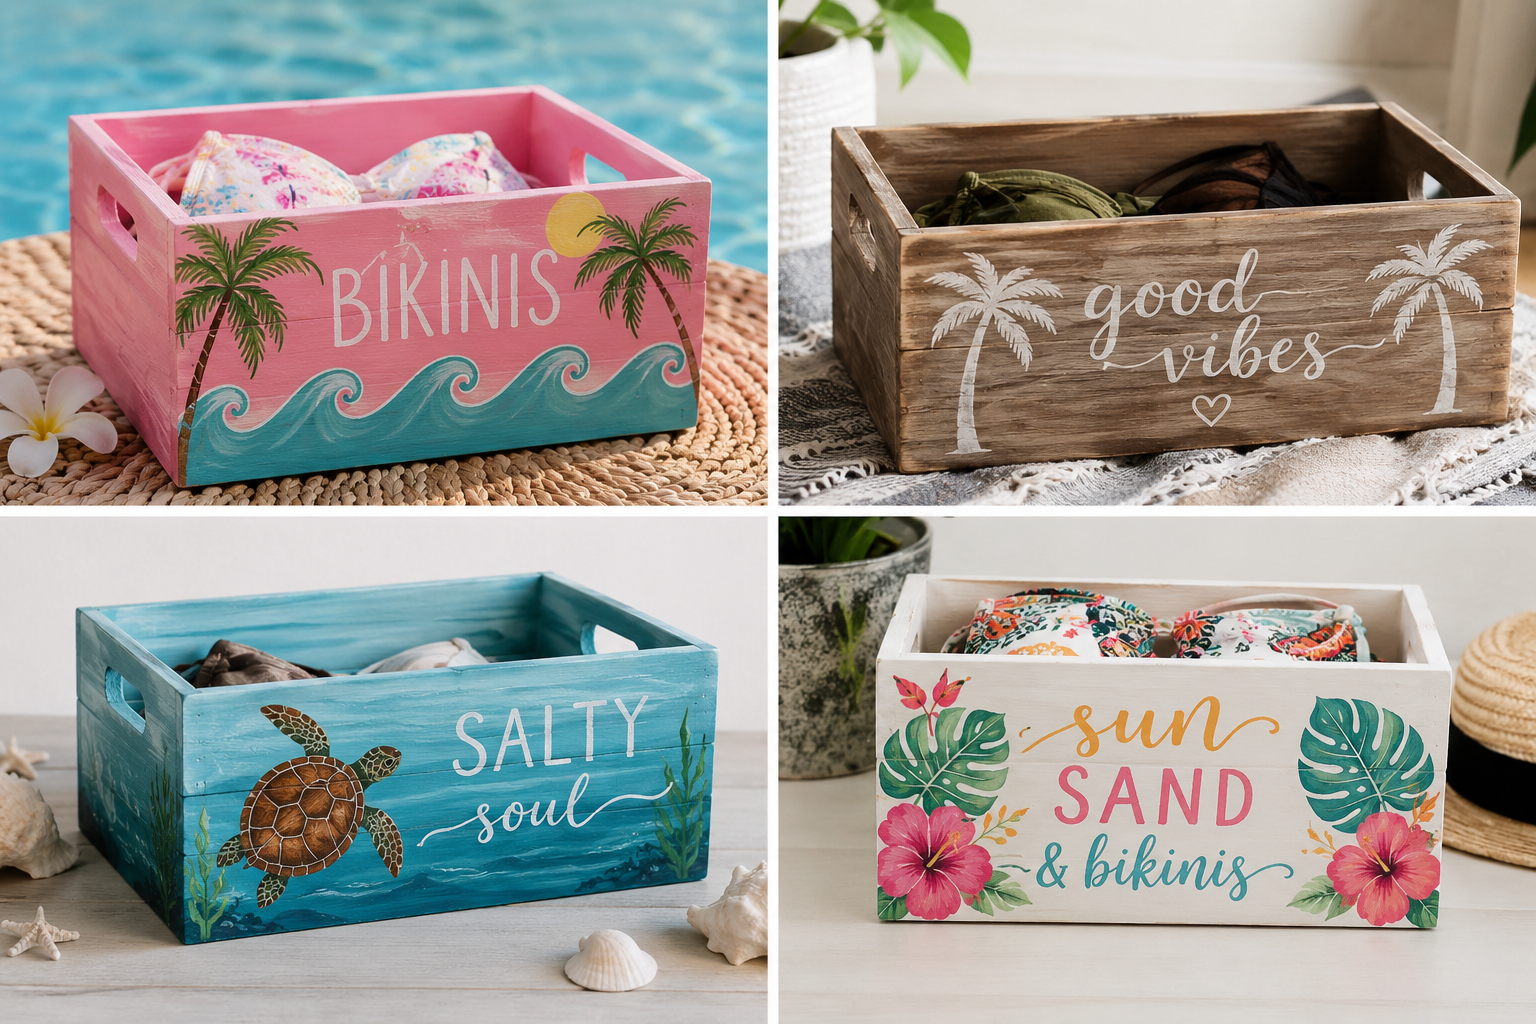
Bikini boxes are decorative storage boxes made for swimwear and beach essentials. Most are created from wooden crates, then painted with tropical designs, cute lettering, ocean details, or beachy patterns.
The classic bikini box look usually includes fun summer motifs like palm trees, flamingos, shells, waves, suns, hibiscus flowers, surfboards, lemons, beach umbrellas, or phrases like “Bikinis,” “Pool Day,” “Beach Club,” or “Swim.” Some are bright and playful, while others are softer, rustic, coastal, or boho.
That is exactly why bikini boxes are becoming so popular. They are useful, affordable, easy to personalize, and beautiful enough to leave out as decor. You can make one for your own swimwear, create one for your pool area, use it in a beach house, gift it to a friend, or style it for a bachelorette weekend.
The best part is that you do not need advanced painting skills. A bikini box can be as simple as a wooden crate with a painted word on the front, or as detailed as a full tropical scene with waves, palm leaves, flowers, shells, and hand-painted lettering.
You can also use the same idea for more than bikinis. These boxes work beautifully for beach towels, sunscreen, sunglasses, hair clips, pool toys, flip-flops, goggles, beach reads, or vacation accessories. Basically, if it belongs in your summer life, it can probably go in a bikini box.
Why Bikini Boxes Are Trending Right Now
Bikini boxes are trending because they sit right in the middle of several things people already love: summer decorating, DIY crafts, beach organization, aesthetic storage, and personalized home projects.
They feel fun without being complicated. They give you that “I made this myself” feeling without needing expensive tools, a big workspace, or a full weekend of effort. You can finish a simple bikini box in one afternoon, but it still feels like a proper little summer project.
- They are beginner-friendly.
- They can be made with affordable supplies.
- They work indoors, outdoors, by the pool, or in a bedroom.
- They are easy to personalize with colors, names, and themes.
- They make swimwear storage feel cute instead of messy.
- They are perfect for summer parties, beach houses, and vacation rentals.
- They can hold bikinis, towels, sunscreen, beach bags, pool toys, and cover ups.
- They make thoughtful handmade gifts.
A big reason people search for bikini boxes ideas is because the project is so flexible. You do not have to copy one exact look. You can create a box that feels preppy, coastal, tropical, rustic, girly, minimal, boho, retro, or full-on vacation mode.
Once your bikini box is finished, you can style it with your favorite bikinis, rolled beach cover ups, woven beach bags, and beach outfits so it feels like a little summer corner instead of just storage.
What You Need to Make DIY Bikini Boxes
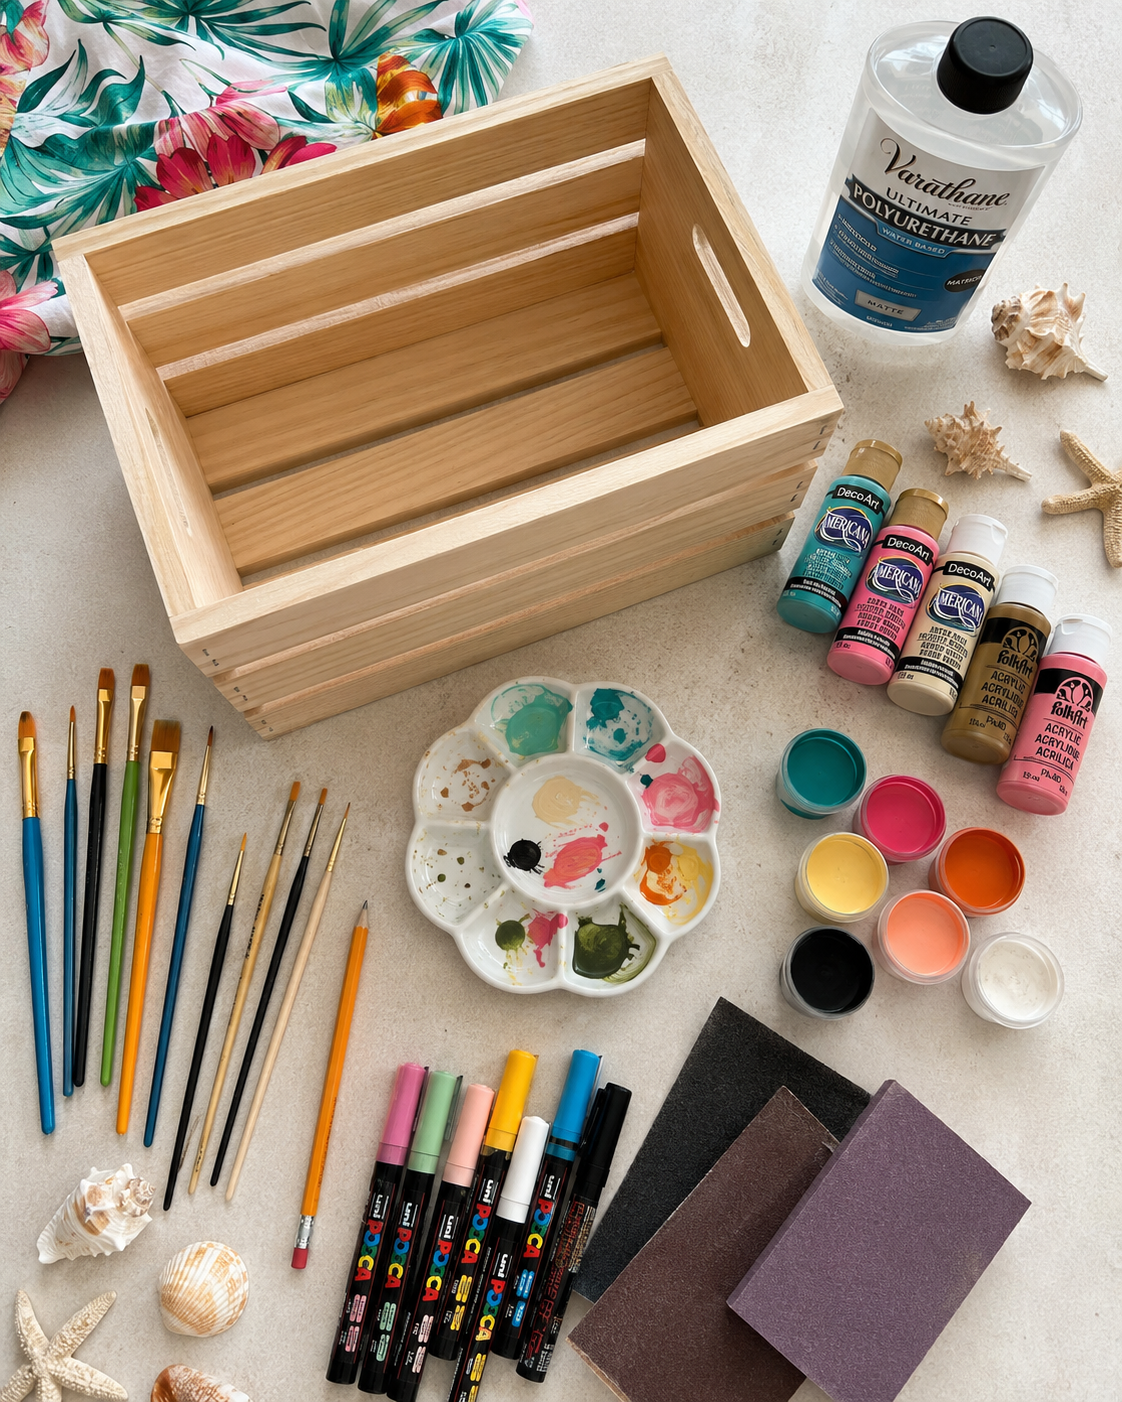
Before we get into the painting part, let’s talk supplies. The good news is that DIY bikini boxes do not require anything fancy. You can start with a basic wooden crate and a small set of acrylic paints.
| Supply | Why You Need It |
|---|---|
| Wooden crate or wooden storage box | This becomes the base of your bikini box. |
| Sandpaper | Smooths rough edges and helps paint grip. |
| Acrylic paint | An easy beginner-friendly paint option for decorative wood crafts. |
| Paint brushes | Use different sizes for base coats and details. |
| Foam brush | Helpful for smooth background paint. |
| Pencil and eraser | For sketching letters and designs before painting. |
| Painter’s tape | Helps create clean edges, stripes, and borders. |
| Paint markers | Great for lettering, outlines, dots, and small details. |
| Clear sealant or varnish | Protects the painted design. |
| Optional stencils | Helpful for letters, shells, stars, or palm leaves. |
For the crate itself, look for something sturdy enough to hold swimwear, towels, and beach accessories. Many bikini boxes are made from medium-sized wooden craft crates, which are big enough to be useful without feeling huge. You can see a simple example in this Michaels bikini box project.
If you want a rustic look, choose a raw wooden crate with visible grain. If you want a cleaner, more polished look, choose smoother wood or spend extra time sanding the crate before painting.
If you are making this for outdoor use, do not skip the sealer. Paint alone is usually not enough protection for sun, splashes, damp towels, or humid pool areas. A little extra protection at the end can make your bikini box last much longer.
Best Wooden Crates for Bikini Boxes
When people search for wooden crates for bikini boxes, they usually want to know one thing: what kind of box actually works?
The easiest choice is a simple open wooden crate. It should be lightweight enough to move around but sturdy enough to hold towels, swimwear, or pool accessories. Open crates work especially well because you can see everything inside, and they give that casual summer storage look.
Look for:
- A medium-sized wooden crate.
- Smooth wood or wood that can be sanded easily.
- Slatted sides if you want a beachy crate look.
- A flat front panel if you want big lettering.
- Handles or side openings if you plan to move it often.
- Enough depth for rolled bikinis, folded towels, or sunscreen bottles.
Avoid crates that feel flimsy, cracked, or very rough. If you are making a bikini box for decoration only, a cheaper craft crate can work. But if you want to use it all summer, especially near a pool or patio, it is worth choosing a stronger box.
For more inspiration, this ocean themed wood crate bikini box shows how a simple crate can become something much more fun with paint and beachy details.
You can also look for small unfinished wooden storage bins, handled wooden caddies, toy crates, vintage crates, or rectangular wooden planter-style boxes. The exact shape is not as important as the surface. You want something that has enough flat space for painting and enough room inside to actually hold your summer things.
How to Prep a Wooden Crate Before Painting
This is the part that feels boring, but it is the secret to making your bikini box look polished instead of rushed. Prepping the wood helps the paint go on smoother, stick better, and last longer.
- Check the crate for splinters, cracks, glue blobs, staples, and rough spots.
- Lightly sand the wood, especially the front and top edges.
- Wipe away dust with a dry or slightly damp cloth.
- Let the crate dry completely before painting.
- Use primer if the wood is very rough, dark, porous, or uneven.
If you plan to use paint markers, it is especially helpful to have a smooth surface. This POSCA guide for using markers on wood explains that wood is porous and that treated or varnished wood may need sanding before decorating.
Do not skip the dust-removal step. Dust left on the crate can mix with paint and make the finish look gritty. It is such a small thing, but it makes a huge difference.
If the crate has rough slats, spend extra time on the areas where your hands will touch the box. The top edges, side handles, and front panel matter most. A cute bikini box should not scratch your fingers or snag your towels.
Primer is optional, but it can help if the wood is very absorbent or uneven. If you want bright colors to pop, a white primer or pale base coat can make the final design look cleaner.
How to Plan Your Bikini Box Design
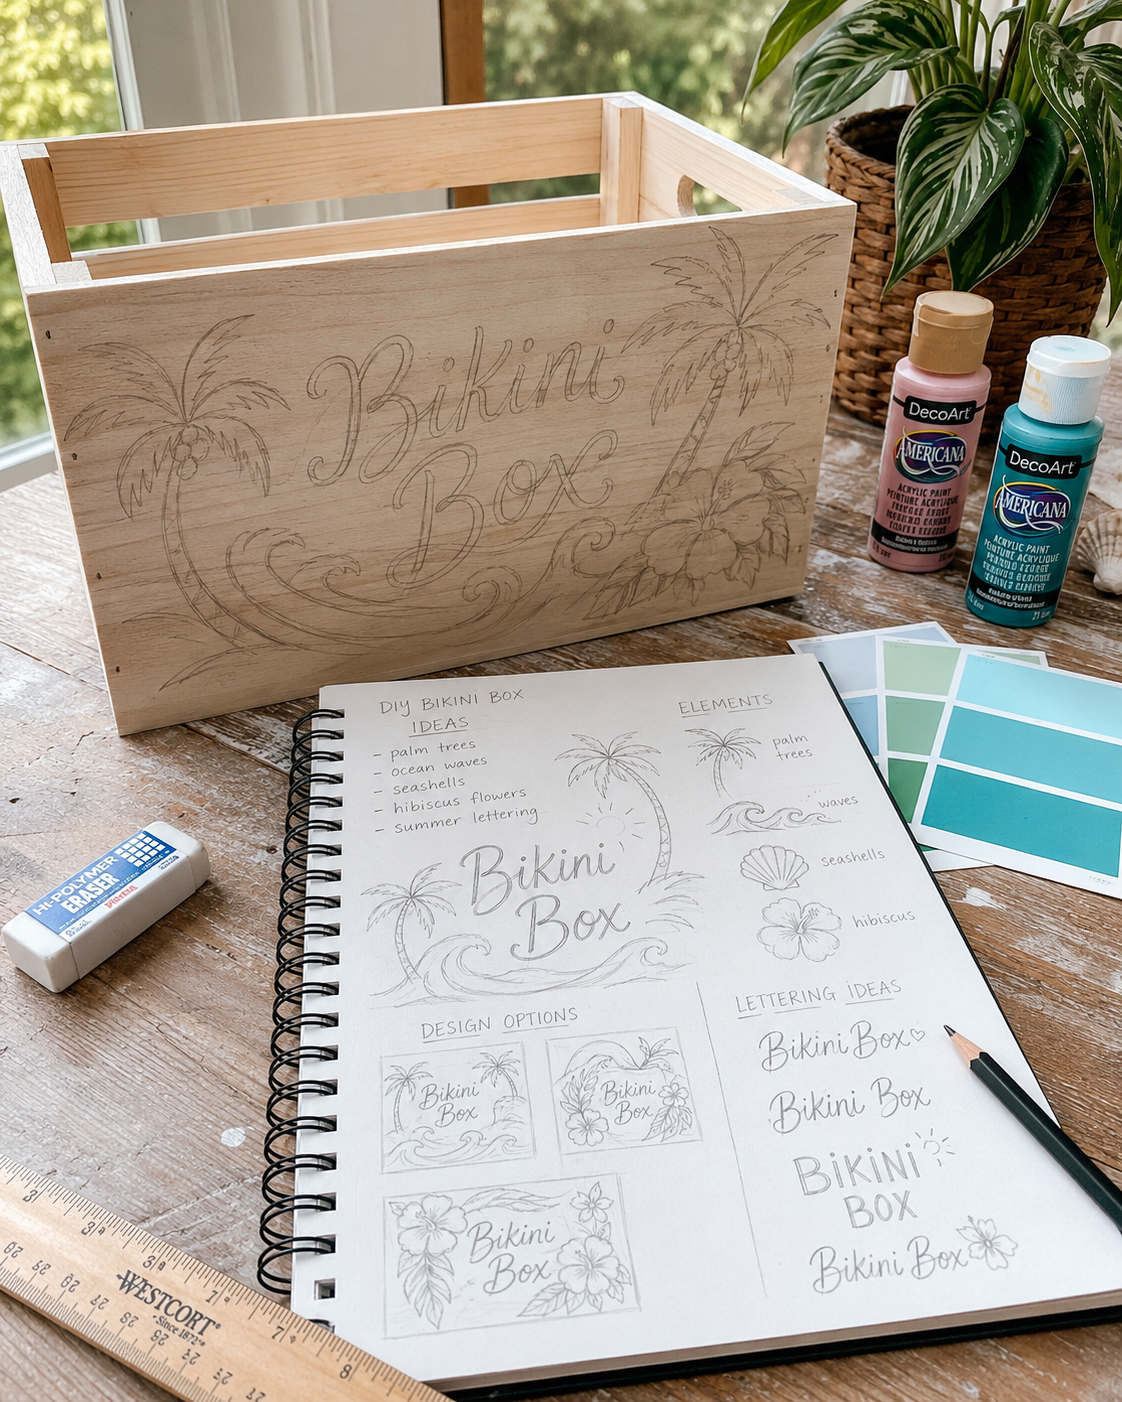
Before you open the paint, take five minutes to plan the vibe. Not in a stressful way. Just enough so you do not end up painting a giant flamingo and then realizing you have no space left for the word “Bikinis.”
Start with the purpose. Is your box for your own bedroom? A pool area? A beach house? A vacation rental? A gift? A bachelorette weekend? A kids’ swim gear corner?
Then choose the style.
Cute Tropical Bikini Box
This style works beautifully with palm trees, flamingos, hibiscus flowers, suns, waves, fruit, and playful lettering. It feels colorful, cheerful, and very Pinterest-friendly.
Rustic Beach House Bikini Box
This look is softer and more natural. Think weathered wood, whitewashed paint, shells, rope details, simple blue wave lines, tiny starfish, and relaxed hand lettering.
Preppy Pool Club Bikini Box
This is a more polished look with stripes, scalloped borders, block letters, beach club wording, clean outlines, and maybe a small umbrella or towel motif.
Boho Bikini Box
Go for suns, moons, hand-drawn florals, shells, woven textures, soft abstract waves, and earthy beachy patterns. This style looks especially pretty with crochet textures and neutral accessories.
Retro Summer Bikini Box
Try checkerboard details, groovy flowers, 70s-inspired lettering, wavy borders, sunshine motifs, and playful phrase ideas like “Poolside,” “Cabana,” or “Sun Club.”
A good beginner formula is: front panel for the main word or phrase, side panels for smaller repeated patterns, and the inside edge for a tiny detail or border.
Try not to put every idea on one box. This is the easiest mistake to make. If you love shells, palm trees, flamingos, waves, lemons, bows, flowers, and surfboards, pick three of them for one design. You can always make another bikini box later.
Bikini Boxes Ideas: Design Themes to Try
This is where the project gets really fun. If you are searching for bikini boxes inspo, here are some of the cutest design themes to try.
1. The Classic “Bikinis” Box
Paint the word “Bikinis” across the front in large letters, then add small tropical details around it. This is simple, clear, and perfect for storage. It also photographs well because people instantly understand what the box is for.
Add palm leaves in the corners, tiny shells around the letters, a wave border at the bottom, a sun above the lettering, or small hibiscus flowers.
2. Ocean Wave Bikini Box
Paint the lower half of the crate with layered wave shapes. Add sea foam dots, small fish, shells, starfish, or a tiny surfboard. This is beginner-friendly because waves do not need to be perfectly symmetrical.
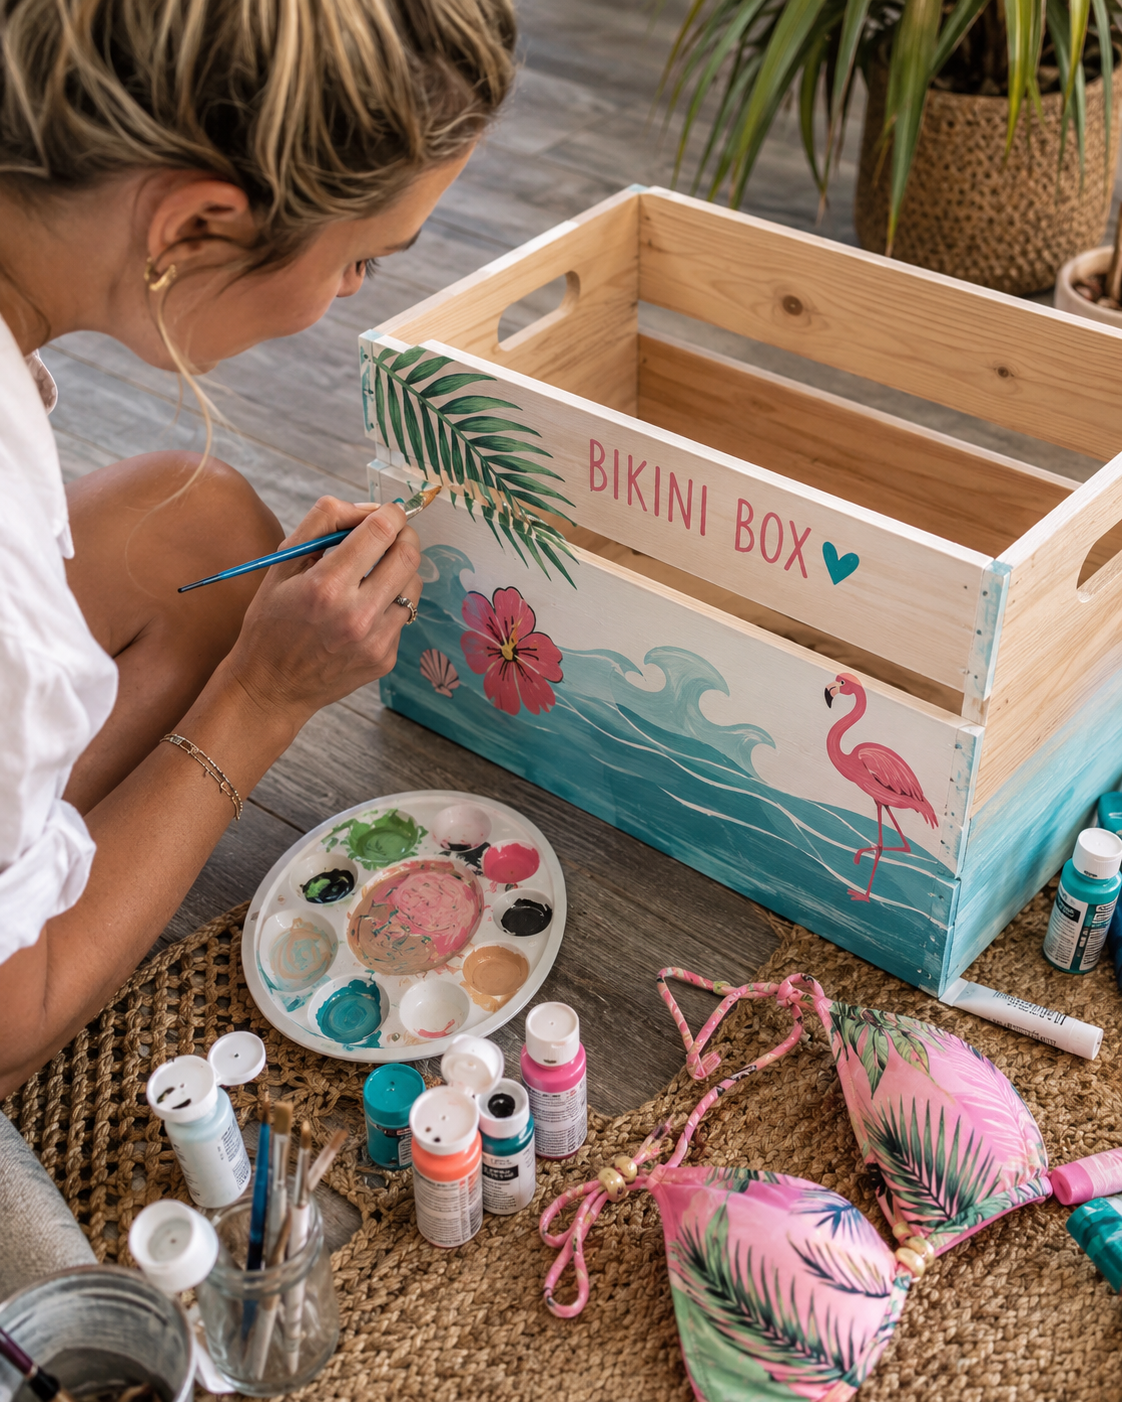
3. Flamingo Pool Party Box
A flamingo is a perfect bikini box motif because it feels playful and instantly summery. Paint one large flamingo on the side or use a small flamingo next to the lettering.
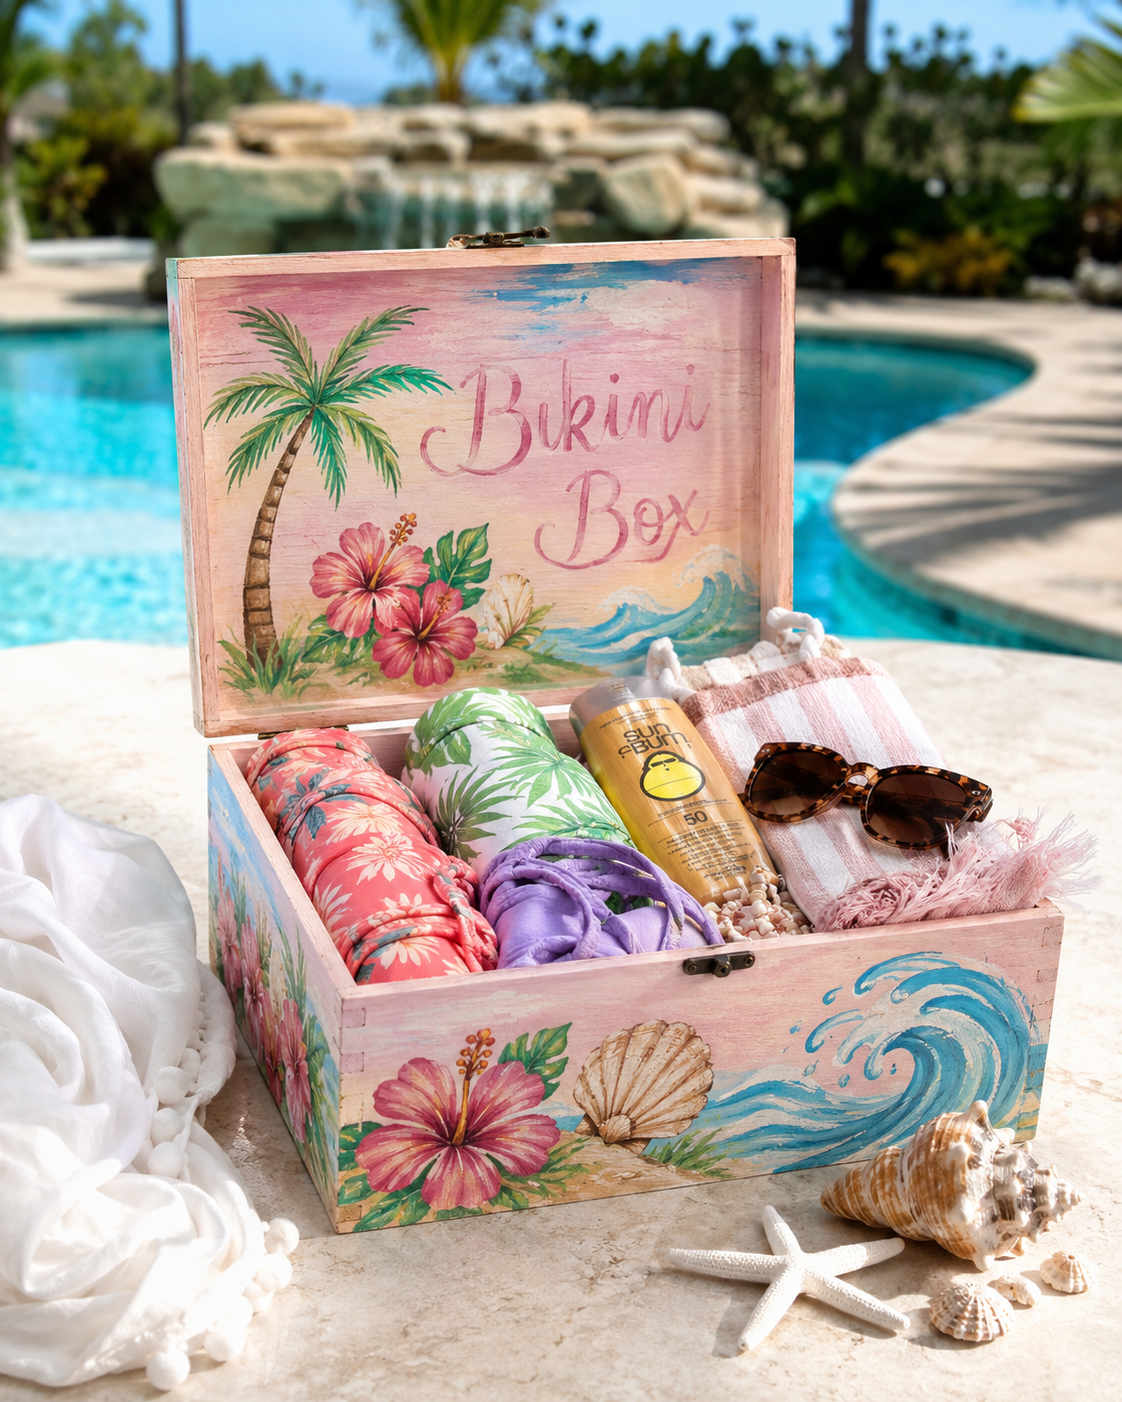
4. Palm Tree Sunset Box
This is one of the most classic beach designs. Paint a sunset circle or oval, then add dark palm silhouettes over it. Even if you are a beginner, silhouettes are easier than detailed realistic painting.
5. Shell Collector Bikini Box
If you want something softer, paint shells, starfish, pearls, and little wave lines. This works well for a more coastal cottage look.
6. Surfboard Summer Box
Paint mini surfboards standing upright across the side of the box. Each surfboard can have a different stripe or flower pattern. This is a great design if you want something colorful without needing advanced painting skills.
7. Beach Club Box
Paint the words “Beach Club,” “Bikini Club,” or “Pool Club” on the front. Use clean block lettering, stripes, and a small icon like an umbrella, shell, or sun.
8. Bachelorette Bikini Box
Make a personalized bikini box for a girls’ trip, bridal beach weekend, or bachelorette pool party. Add the bride’s name, the destination, or the trip year.
- Bride’s Swim Club
- Bikinis & Bubbly
- Beach Weekend
- Cabana Crew
- Poolside Bride
9. Kids’ Pool Gear Box
For a family-friendly version, use the box for goggles, floats, sunscreen, and little swimsuits. Paint it with cheerful icons and clear labels so kids can help clean up.
10. Minimal Coastal Box
Keep the wood mostly natural and paint only simple lettering with a small wave or shell detail. This is perfect if your style is more calm, neutral, or beach house chic.
Minimal bikini boxes can actually look very expensive when done well. A natural wood crate with white lettering, a small shell, and a soft wave line can feel more boutique than busy.
Bikini Boxes Painting: Step-by-Step Tutorial
Step 1: Paint the Base Coat
Start with the background. You can paint the whole box, just the front panel, or selected areas. If you want a clean, bright design, paint one or two thin base coats. Thin coats are better than one thick coat because they dry smoother and are less likely to peel.
If you want the wood grain to show through, use less paint or try a dry brush technique. This gives a rustic, weathered effect.
Step 2: Sketch Your Main Design
Once the base coat is dry, lightly sketch your lettering and main shapes with pencil. Do not press too hard. You want guide marks, not deep lines carved into the paint.
For lettering, draw a center line first so your word does not drift upward or downward. If you are nervous about hand lettering, print the word in a font you like, cut it out, and use it as a rough guide.
Step 3: Paint Large Shapes First
Paint the biggest parts of the design before the details. This might be waves, a sunset circle, a flamingo body, palm leaves, or the main letters. Do not worry about outlines yet. Just block in the main shapes.
Step 4: Add Medium Details
After the big shapes dry, add flower petals, palm lines, shell ridges, surfboard stripes, or wave highlights. This is where the box starts to look exciting.
Step 5: Add Outlines
Outlines make a huge difference. Use a thin brush or paint marker to outline letters and motifs. This helps the design look sharper, especially from a distance.
Step 6: Add Highlights and Tiny Finishing Touches
Now add the little things: dots around flowers, tiny stars, white foam on waves, lines inside palm leaves, shell curves, sparkles around lettering, small borders, or a painted frame around the front panel.
Step 7: Let It Dry Fully
Let the paint dry completely before sealing. If you seal too soon, the paint can smear, bubble, or turn cloudy. Drying time depends on the paint, the thickness of the layers, the humidity, and the wood.
Step 8: Seal the Box
Once everything is dry, seal the painted areas. If your bikini box will stay indoors, a water-based craft varnish or clear acrylic spray can work well. If it will be outside or near a pool, choose a product labeled for outdoor use and follow the product directions carefully.
Painting Techniques That Make Bikini Boxes Look Better
You do not need advanced skills, but a few small techniques can make your bikini box look much more professional.
Use Thin Coats
Thick paint can look lumpy and take forever to dry. Thin coats give a smoother finish. If the first coat looks streaky, that is okay. Let it dry and add another.
Use Painter’s Tape for Stripes
If you want stripes, blocked sections, or clean borders, use painter’s tape. Press it down firmly so paint does not bleed under the edge. Remove it before the paint gets fully hard for the cleanest line.
Use a Foam Brush for Backgrounds
Foam brushes are great for base coats because they cover large areas quickly and smoothly.
Use Tiny Brushes for Details
Small brushes help with shells, flowers, lettering touch-ups, and outlines. Do not try to paint tiny details with a big brush. It will only annoy you.
Use Paint Markers for Lettering
Paint markers are a beginner’s best friend. They give you more control than a brush, especially for words, outlines, dots, and small decorative lines.
Outline Last
Outlining too early can make the design messy. Paint your shapes first, let them dry, then outline them at the end.
Repeat One Small Detail
If your bikini box feels unfinished, repeat one tiny motif around it. For example, add little dots, shells, stars, waves, or flowers. Repetition makes the design feel intentional instead of random.
Cute Bikini Boxes Inspo for Different Styles
If you want your bikini box to look extra cute, think about the overall mood before choosing motifs.
For a Tropical Look
Use palm leaves, flamingos, hibiscus flowers, pineapples, lemons, suns, and bold lettering. This style works beautifully if you want a bright, cheerful summer box.
For a Coastal Look
Use waves, shells, starfish, rope-inspired borders, weathered paint, and simple lettering. This is the best option if you want something relaxed and beach house friendly.
For a Pinterest-Girly Look
Use bows, hearts, flowers, scalloped borders, cute phrases, and playful lettering. This style is great for bedrooms, dorm rooms, girls’ trips, or bachelorette weekends.
For a Boho Beach Look
Use suns, moons, abstract waves, hand-drawn florals, and soft natural shapes. Pair it with crochet textures, woven bags, and neutral beach accessories.
For a Clean Modern Look
Use one word, one icon, and a very simple border. For example, “Bikinis” with a tiny wave underneath. Clean designs often look more expensive because they are not overcrowded.
If you are unsure which direction to choose, start with the style that matches where the box will live. A bright flamingo box is perfect by a pool. A soft shell box may look better in a bathroom. A rustic whitewashed box is gorgeous in a beach house or guest room.
What to Put Inside a Bikini Box
A bikini box is cute, but it is also genuinely useful. You can use it for:
- Bikinis
- Bikini tops
- Bikini bottoms
- One piece swimsuits
- Beach towels
- Sunscreen
- Sunglasses
- Hair clips
- Flip-flops
- Beach bags
- Cover ups
- After-sun lotion
- Pool toys
- Goggles
- Waterproof phone pouches
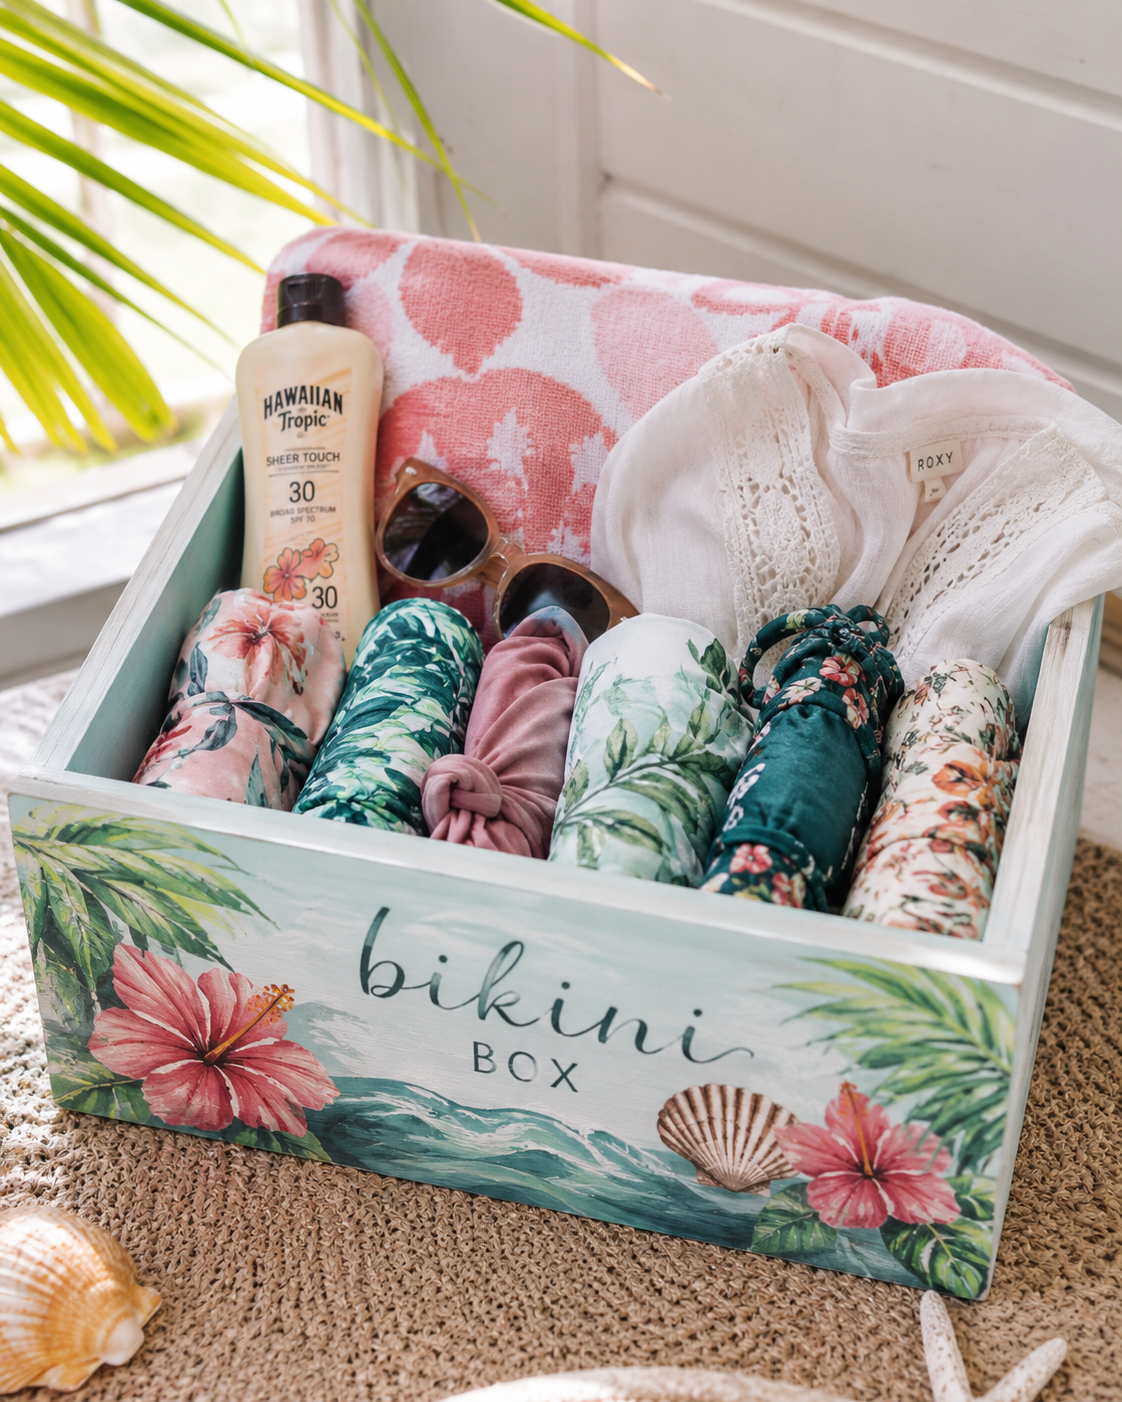
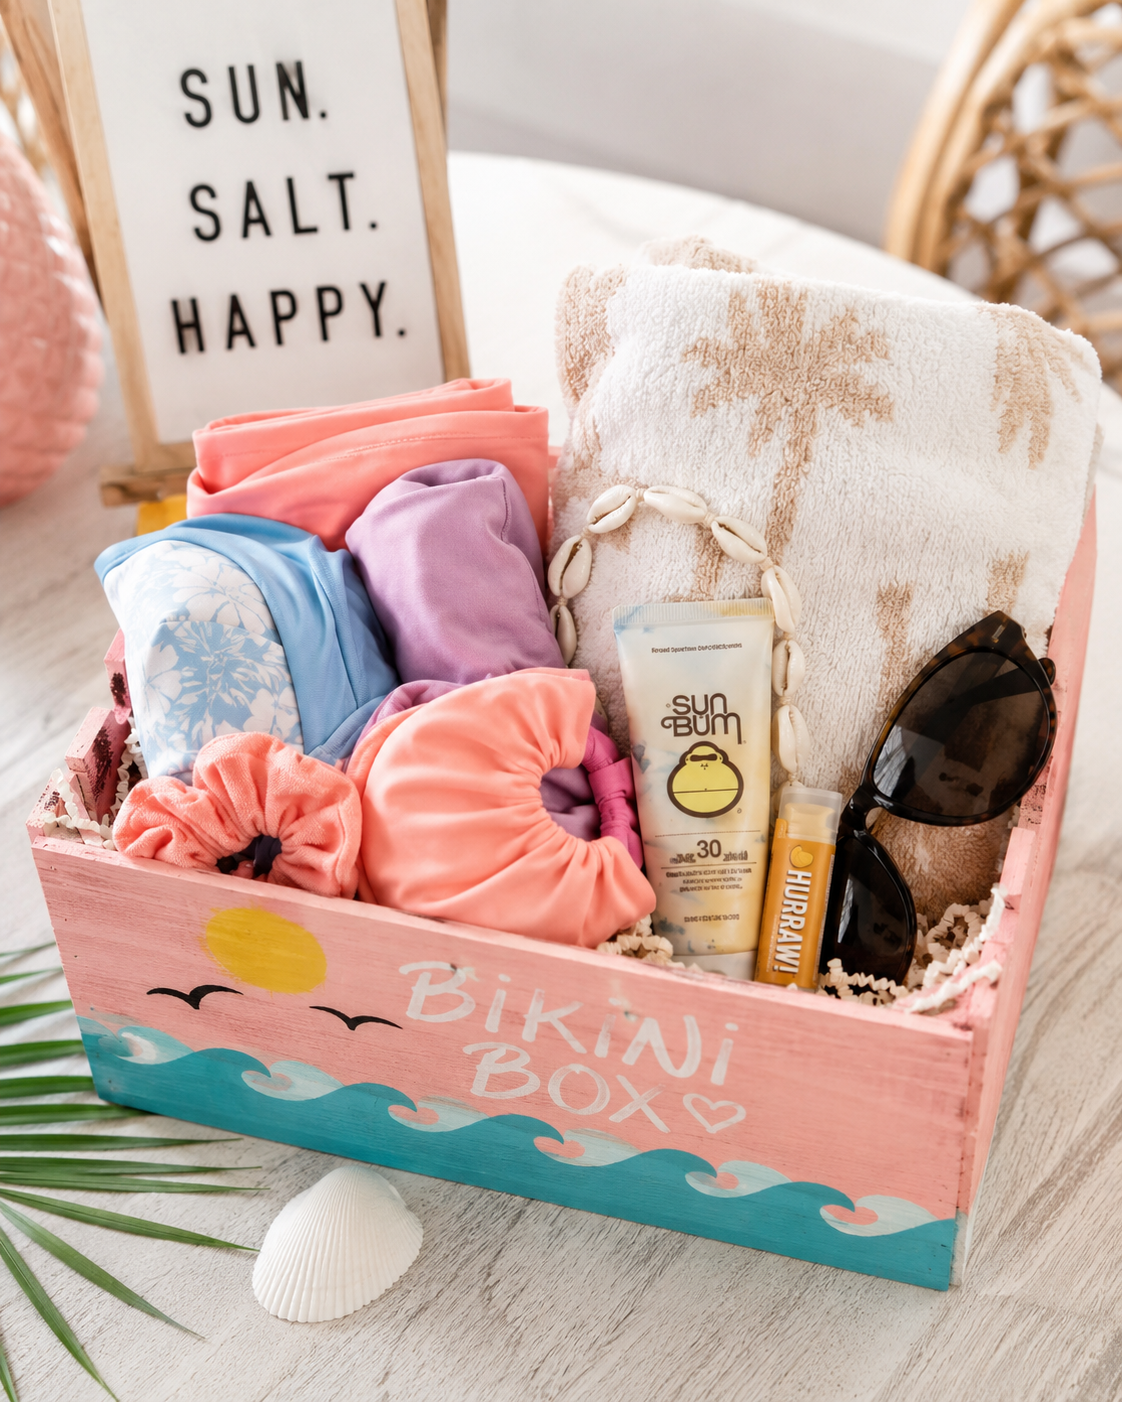
For a pretty styled look, roll your bikinis instead of folding them. Place bulkier items like towels at the back and smaller items like sunglasses or sunscreen at the front.
If you want it to look extra polished, choose a color story for the items inside. For example, place white towels, neutral cover ups, straw accessories, and soft pastel bikinis in a coastal box. Or add bright bikinis, colorful sunglasses, and printed towels to a tropical box.
Where to Use Bikini Boxes
Bikini boxes work in so many places. That is part of the charm.
- In your closet for swimwear storage.
- In a bathroom for rolled towels and bikinis.
- Near the pool for sunscreen and pool accessories.
- On a balcony for summer essentials.
- In a beach house entryway.
- In a vacation rental for guest towels.
- In a laundry room for clean swimwear.
- In a kids’ pool area.
- At a bachelorette weekend.
- As decor for a summer party.
- As a gift basket filled with swimwear and beach accessories.
If you are making one as a gift, fill it with little summer extras like sunscreen, lip balm, hair ties, a beach towel, and maybe a cute bikini or cover up. It feels personal, thoughtful, and way more special than a regular gift bag.
For vacation rentals or guest rooms, a bikini box can also be a really sweet detail. Fill it with rolled towels, sunscreen, and a small note. It instantly makes the space feel more welcoming and thought-out.
How to Seal and Protect a Painted Bikini Box
Sealing is the step that protects your work. If your bikini box is only going to sit in a bedroom or closet, you can keep it simple. If it will live outside, near a pool, or in a humid bathroom, you need to be more careful.
For indoor use, a clear acrylic spray, water-based varnish, or craft sealer is usually enough. Apply thin coats and let each coat dry according to the product label.
For outdoor or poolside use, choose a clear finish that specifically says it is suitable for outdoor use. Moisture, sun, heat, and wet towels are harder on paint than people realize. If you use an indoor-only sealer outside, the box may still fade, peel, or get sticky.
If you are unsure which clear finish to choose, this guide to polycrylic vs polyurethane is helpful for understanding the difference between common protective finishes.
Helpful sealing tips:
- Make sure the paint is fully dry before sealing.
- Test the sealer on a small hidden area first.
- Use thin coats instead of one heavy coat.
- Seal the sides, front, back, and edges.
- Let the box cure before loading it with items.
- Do not leave it sitting directly in heavy rain.
- Reapply protection if the box starts looking worn.
If your bikini box will sit outside, try to keep it under a covered patio, balcony, pool cabana, or shaded area. Even outdoor sealers last longer when the box is not constantly exposed to rain and harsh direct sunlight.
Common Mistakes to Avoid
Let’s save you from the little mistakes that can make this project more annoying than it needs to be.
- Skipping sanding. Rough wood makes paint look uneven and can leave splinters.
- Painting too thickly. Thick paint can peel, bubble, or dry with visible ridges.
- Not letting layers dry. Wet paint layers can smear and turn muddy.
- Using too many design ideas at once. Pick a theme so the design feels intentional.
- Forgetting the box has slats. Plan your lettering so words do not disappear into the spaces.
- Not sealing the finished box. This matters if the box will be handled often or used near water.
- Using indoor sealant outdoors. Outdoor use needs outdoor-rated protection.
- Painting without cleaning the wood. Dust and debris can stop paint from sticking properly.
- Rushing the lettering. Sketch it first.
- Trying to make it perfect. A bikini box is meant to feel handmade, beachy, and fun.
The biggest mistake is usually rushing. This is a simple project, but drying time still matters. A little patience between layers makes the final box look smoother and more expensive.
Beginner-Friendly Bikini Box Design Formula
If you are a complete beginner, use this formula:
One background + one big word + three small motifs + one border.
Example: paint a soft background on the front panel, add the word “Bikinis,” paint two shells and one palm leaf, then add a tiny wave border along the bottom.
That is enough. You do not need to cover every inch.
Another easy formula is natural wood + white lettering + tiny ocean icons. This is great if you want a rustic look and do not want to paint the entire crate.
Or try painted stripes + center label + small flower corners. This gives a preppy summer look without requiring detailed illustration.
If you are nervous, start with the simplest version first. You can always add more later. It is much easier to add a few extra shells or dots than to fix a box that became too busy.
Advanced Tips for a More Polished Bikini Box
Once you feel comfortable, there are a few ways to make your bikini box look more elevated.
Add shadows to your lettering. Paint the word first, then add a slightly darker shadow offset to one side. This makes the letters pop.
Use a limited color palette. Even playful designs look better when the colors feel intentional. Choose four to six colors and repeat them across the box.
Paint the inside edge. A small painted detail on the inside rim makes the box feel more finished.
Use repeating patterns on the sides. Tiny waves, dots, flowers, or shell outlines can make the side panels feel styled without competing with the front.
Add a border around the front panel. A simple painted frame can make the design look cleaner.
Mix brush painting with paint markers. Use brushes for large areas and paint markers for crisp details.
Create dimension with highlights. Add small lighter strokes to waves, flowers, leaves, and letters.
Keep the back simple. The front should be the hero. The sides and back should support it, not fight with it.
If you are making bikini boxes to sell or gift, consistency matters. Use the same base layout, then customize each one with different names, phrases, or motifs. This keeps the process easier while still making each box feel personal.
How Much Does It Cost to Make a Bikini Box?
The cost depends on what you already have at home, but most DIY bikini boxes can be made pretty affordably.
| Item | Estimated Cost |
|---|---|
| Wooden crate | $8–$20 |
| Acrylic paint | $3–$15 |
| Brushes | $3–$10 |
| Sandpaper | $2–$6 |
| Paint markers | $5–$20 |
| Clear sealer | $5–$15 |
| Optional stencils | $3–$10 |
| Optional shells or decor | $2–$10 |
A basic bikini box can cost around $15–$30 if you already have some paint and brushes. A more detailed version with markers, sealant, stencils, and decorations may cost $35–$60.
If you plan to make more than one, the cost per box usually drops because you can reuse paints, brushes, markers, sandpaper, stencils, and sealant. That makes bikini boxes a great group craft idea for summer parties, bridal weekends, or family beach projects.
How Long Does It Take to Make a Bikini Box?
| Project Style | Estimated Time |
|---|---|
| Simple lettering only | 1–2 hours |
| Basic painted design | 2–3 hours |
| Detailed tropical design | 4–6 hours |
| Multi-sided painted box | 1–2 days with drying time |
| Sealed outdoor-use box | 1–3 days including cure time |
Do not judge the project by active painting time only. Drying time is the sneaky part. If you want the box to look good and last, give it time between layers.
A simple indoor bikini box can usually be made in one afternoon. A more detailed outdoor bikini box is better as a slow weekend project so the paint and sealer have plenty of time to dry.
Can You Sell Painted Bikini Boxes?
Yes, handmade bikini boxes can be a cute product idea, especially for summer markets, beach towns, pool owners, bachelorette gifts, vacation rentals, and personalized gifts.
If you want to sell them, think beyond just “painted crate.” Sell the vibe and the use.
- Personalized bikini storage box.
- Poolside towel and swimwear crate.
- Bachelorette beach weekend box.
- Kids’ swim gear storage crate.
- Beach house guest towel box.
- Summer gift basket crate.
- Vacation rental welcome box.
To make them more sellable, offer customization: name, destination, year, phrase, theme, motif, matching colors, or gift-ready filling options.
If you sell them, photograph them styled. A plain box on a table is fine, but a bikini box filled with rolled swimwear, a towel, sunglasses, and a beach bag will always feel more desirable.
Also think about seasonal timing. Bikini boxes are most naturally attractive before summer, during spring break season, before bachelorette trips, and around beach vacation planning months. That is when people are already thinking about pool areas, swimwear storage, beach bags, and summer outfits.
Bikini Box Gift Ideas
A painted bikini box makes such a cute gift because it feels personal but still useful. You can make one for a friend, sister, daughter, bride, bridesmaid, mom, or anyone who loves summer.
- Bikini + sunscreen + lip balm.
- Towel + sunglasses + beach read.
- Cover up + beach bag + hair clip.
- Pool toys + goggles + kids’ swimsuits.
- Bachelorette bikini box with matching accessories.
- Vacation countdown box.
- Beach house welcome basket.
For a more polished gift, line the inside with tissue paper, add rolled swimwear, and tie a ribbon around one side handle. You can also attach a tiny handwritten tag that says, “For beach days, pool days, and every sunny little escape.”
If you are making one for a bride or bachelorette weekend, add the destination and year to the front. It turns the bikini box into a keepsake instead of just a storage crate.
Best Phrases to Paint on Bikini Boxes
| Simple | Fun |
|---|---|
| Bikinis | Bikini Club |
| Swim | Poolside |
| Beach Day | Cabana Days |
| Summer Things | Sun Club |
| Beach Box | Bikinis & Sunshine |
| Pool Stuff | Beach Please |
| Swimwear | Saltwater Days |
| Vacation Mode | Pool Girl Era |
| Beach Essentials | Resort Ready |
| Bikini Storage | Towel & Tan Lines |
For SEO images and Pinterest, the simplest phrase is often the strongest: “Bikinis” or “Bikini Box.” It makes the purpose instantly clear.
If you want a softer, more elegant box, try phrases like “Beach Things,” “Sun Days,” “By the Pool,” or “Summer Essentials.” If you want a fun party box, go for “Bikini Club,” “Cabana Crew,” or “Bikinis & Bubbly.”
FAQ About Bikini Boxes
What are bikini boxes?
Bikini boxes are usually painted wooden crates or storage boxes used for bikinis, swimwear, towels, sunscreen, beach accessories, or pool gear. They are popular as DIY summer decor because they are both cute and useful.
How do you make bikini boxes?
To make bikini boxes, start with a wooden crate, sand it, paint a base coat, sketch your design, paint your lettering and motifs, let it dry, and seal it with a clear protective finish.
What kind of paint do you use for bikini boxes?
Acrylic paint is the easiest beginner-friendly choice for decorative wooden bikini boxes. For outdoor use, choose paints and sealers suitable for exterior conditions.
Where can I buy wooden crates for bikini boxes?
You can usually find wooden crates at craft stores, home decor stores, hardware stores, dollar stores, and online marketplaces. Look for unfinished wooden crates if you want to paint them yourself.
Do you need to seal a bikini box?
Yes, sealing is recommended, especially if the box will be handled often, used near water, or kept outdoors. Use a clear sealer that matches how and where you plan to use the box.
Can bikini boxes stay outside?
They can, but only if the wood, paint, and sealant are suitable for outdoor use. Even then, it is best to keep them under cover rather than leaving them in heavy rain.
What can you put in a bikini box?
You can put bikinis, swimsuits, towels, sunscreen, sunglasses, beach bags, cover ups, pool toys, goggles, flip-flops, and other beach or pool essentials inside a bikini box.
Are bikini boxes good for gifts?
Yes, bikini boxes make adorable summer gifts. Fill one with a towel, sunscreen, sunglasses, and swimwear for a thoughtful beach-themed gift basket.
Are bikini boxes only for bikinis?
No. Even though they are called bikini boxes, you can use them for towels, sunscreen, pool toys, beach bags, cover ups, flip-flops, hair accessories, and any other summer essentials.
Can beginners paint bikini boxes?
Yes. Beginners can make beautiful bikini boxes by keeping the design simple. Start with one word, one background color, a few small motifs, and a simple border.
Final Thoughts: Your Bikini Box Does Not Have to Be Perfect
The sweetest thing about bikini boxes is that they do not need to be perfect. They are supposed to feel fun, handmade, beachy, and personal. A slightly wobbly letter or imperfect shell does not ruin the box. It gives it charm.
Start simple. Pick a wooden crate, choose one theme, paint one main word, add a few cute details, and seal it properly. That is enough to create something useful and beautiful.
And once you make one, do not be surprised if you suddenly want to make five more: one for bikinis, one for towels, one for sunscreen, one for pool toys, and one just because it looks adorable in the corner.
Whether you are making a DIY bikini box for your own summer setup, a beach house, a pool day station, or a handmade gift, this is one of those projects that gives you a lot of joy for a pretty small amount of effort.
So grab the crate, open the paint, put on a summer playlist, and make the kind of bikini box that feels like sunshine in storage form.
Shop Bestselling Bikinis & Beach Essentials
Fill your bikini box with customer-loved swimwear, beach cover ups, and sunny-day favorites from Sunset and Swim.
-
All Products, All Swimwear, Bestselling Items, Bikinis, Brazilian and Cheeky Bikinis, New and Trending, Underboob Cut Out Bikinis & Swimsuits
Sunlit Temptation Underboob Bikini Set
Original price was: $63.99.$31.99Current price is: $31.99.Select options This product has multiple variants. The options may be chosen on the product pageQuick View -
All Products, All Swimwear, Bestselling Items, Bikinis, Extreme Bikinis, Micro Bikinis, Micro Kinis, Underboob Bikinis, Underboob Cut Out Bikinis & Swimsuits
Underboob Bliss Micro Cut Out Bikini
Original price was: $64.99.$31.99Current price is: $31.99.Select options This product has multiple variants. The options may be chosen on the product pageQuick View -
All Products, All Swimwear, Bestselling Items, Bikinis, New and Trending, See Through Bikinis, Transparent See Through Fashion
Leave Me in the Sunshine Semi Transparent Bikini
Original price was: $59.99.$29.99Current price is: $29.99.Select options This product has multiple variants. The options may be chosen on the product pageQuick View -
All Products, All Swimwear, Animal Print Swimwear, Bestselling Items, Bikinis, Brazilian and Cheeky Bikinis, Leopard Bikinis, Leopard Swimwear & Cover Ups, String Bikinis, Triangle Bikini Sets
Gisele Super Hot Leopard Print Triangle Brazilian Bikini
Original price was: $67.99.$33.99Current price is: $33.99.Select options This product has multiple variants. The options may be chosen on the product pageQuick View -
All Products, All Swimwear, Bestselling Items, Bikinis, Brazilian and Cheeky Bikinis, Cut Out Bikinis, High Cut Bikinis & Swimsuits, Micro Bikinis, Thong Bikinis | Micro Bikinis & String Bikinis Swimsuits, Underboob Bikinis, Underboob Cut Out Bikinis & Swimsuits
Thong Tide Cut Out Underboob Bikini Set
Original price was: $77.99.$41.99Current price is: $41.99.Select options This product has multiple variants. The options may be chosen on the product pageQuick View -
All Products, All Swimwear, Bestselling Items, Bikinis, Neoprene Crochet Swimwear
Sunset Shores Chic Neoprene Colorblock Bikini
Original price was: $86.99.$43.99Current price is: $43.99.Select options This product has multiple variants. The options may be chosen on the product pageQuick View -
All Products, All Swimwear, Bestselling Items, Cut Out Monokinis, Extreme Monokinis, Extreme Swimsuits, High Cut Bikinis & Swimsuits, Micro Swimsuits, One Piece Swimsuits, Side Boob Swimsuits, Thong Bikinis | Micro Bikinis & String Bikinis Swimsuits, Thong Monokinis, Thong Swimsuits
Alessa High Cut Thong Swimsuit One Piece G String Swimsuit
Original price was: $71.99.$24.99Current price is: $24.99.Select options This product has multiple variants. The options may be chosen on the product pageQuick View -
All Products, All Swimwear, Bestselling Items, Bikinis, Brazilian and Cheeky Bikinis, Cut Out Bikinis, Micro Bikinis, Micro Kinis, Thong Bikinis | Micro Bikinis & String Bikinis Swimsuits, Underboob Bikinis, Underboob Cut Out Bikinis & Swimsuits
Midnight Tease Micro Underboob Cut Out Bikini
Original price was: $49.99.$19.99Current price is: $19.99.Select options This product has multiple variants. The options may be chosen on the product pageQuick View -
All Products, All Swimwear, Bestselling Items, Cute Bikinis & Swimsuits, Cute Swimsuits, Cute Swimsuits, Double Layered Bikinis, Modest Swimsuits, Swimwear and Bikinis, One Piece Swimsuits, Polka Dot Swimsuits, Preppy Bikinis & Swimsuits
Tropical Charm Polka Dot Side-Tie One-Piece Swimsuit
Original price was: $79.99.$37.99Current price is: $37.99.Select options This product has multiple variants. The options may be chosen on the product pageQuick View -
All Products, All Swimwear, Beach Cover Ups, Beach Outfits, Bestselling Items, Crochet Cover Ups, Dresses, New and Trending
Sunkissed Shores Deep V Crochet Cover Up Dress
Original price was: $64.99.$29.99Current price is: $29.99.Select options This product has multiple variants. The options may be chosen on the product pageQuick View -
All Products, All Swimwear, Bathing suits for women over 50, Bestselling Items, Modest Swimsuits, Swimwear and Bikinis, One Piece Swimsuits
Midnight Mesh Hourglass One Piece Swimsuit
Original price was: $59.99.$29.99Current price is: $29.99.Select options This product has multiple variants. The options may be chosen on the product pageQuick View -
All Products, All Swimwear, Bestselling Items, Bikinis, Brazilian and Cheeky Bikinis, Cute Bikinis, Cute Bikinis & Swimsuits, Neoprene Crochet Swimwear
Sunset and Swim Sexy Neoprene Crochet Triangle Bikini Turquoise
Original price was: $120.99.$59.99Current price is: $59.99.Select options This product has multiple variants. The options may be chosen on the product pageQuick View -
All Products, Beach Cover Ups, Beach Outfits, Bestselling Items, Dresses, New and Trending
Summer of Love Backless Lace Bohemian Mini Dress
Original price was: $85.99.$42.99Current price is: $42.99.Select options This product has multiple variants. The options may be chosen on the product pageQuick View -
All Products, All Swimwear, Bestselling Items, Bikinis, Cut Out Bikinis, Extreme Bikinis, Extreme Thong Bikinis, Micro Bikinis, Micro Kinis, Micro Swimsuits, Side Boob Bikinis, Thong Bikinis | Micro Bikinis & String Bikinis Swimsuits
Alluring Cut Out Micro Kini
Original price was: $79.99.$39.99Current price is: $39.99.Select options This product has multiple variants. The options may be chosen on the product pageQuick View -
All Products, All Swimwear, Bathing suits for women over 50, Bestselling Items, Bikinis, High Waist Bikini & Swimsuits, Modest Swimsuits, Swimwear and Bikinis, Preppy Bikinis & Swimsuits, Push Up Bikinis & Swimsuits
Confident Coastline Plaid High Waist Bikini
Original price was: $79.99.$39.99Current price is: $39.99.Select options This product has multiple variants. The options may be chosen on the product pageQuick View -
All Products, All Swimwear, Bestselling Items, Bikinis, High Waist Bikini & Swimsuits, Modest Swimsuits, Swimwear and Bikinis
Modest 3 PCS White Floral Swimsuit Push up High Waist Swimwear Cover Up Set
Original price was: $108.99.$49.99Current price is: $49.99.Select options This product has multiple variants. The options may be chosen on the product pageQuick View -
All Products, All Swimwear, Bestselling Items, Bikinis, Brazilian and Cheeky Bikinis, Cute Bikinis, Cute Bikinis & Swimsuits, Micro Bikinis, Micro Kinis, New and Trending, Ruffle Swimsuits & Bikinis, String Bikinis, Thong Bikinis | Micro Bikinis & String Bikinis Swimsuits
The Bombshell Brazilian Micro Thong Bikini
Original price was: $59.99.$29.99Current price is: $29.99.Select options This product has multiple variants. The options may be chosen on the product pageQuick View -
All Products, All Swimwear, Bestselling Items, Brazilian and Cheeky Bikinis, Cherry Swimwear, New and Trending
Cherry Pop 3-Piece Bikini Set
Original price was: $72.99.$33.99Current price is: $33.99.Select options This product has multiple variants. The options may be chosen on the product pageQuick View -
All Products, All Swimwear, Bestselling Items, Bikinis, Brazilian and Cheeky Bikinis, Cherry Swimwear, Micro Bikinis, Micro Kinis, New and Trending
Cherry Bombshell Bikini Set
Original price was: $66.99.$33.99Current price is: $33.99.Select options This product has multiple variants. The options may be chosen on the product pageQuick View -
All Products, All Swimwear, Bestselling Items, Bikinis, Bling Glitter Bikinis & Swimsuits, Crochet Beach Tops, Crochet Bikinis, Crochet Swimwear, See Through Bikinis, Sexy DD+ Swimwear, Transparent See Through Fashion
Sensual Waves Crochet Sexy Rhinestone See Through Bikini Sunset and Swim
Original price was: $280.99.$139.99Current price is: $139.99.Select options This product has multiple variants. The options may be chosen on the product pageQuick View -
All Products, All Swimwear, Bestselling Items, Micro Kinis, One Piece Swimsuits, Thong Bikinis | Micro Bikinis & String Bikinis Swimsuits
Sexy Halter Thong Extreme Micro Swimsuit Monokini
Original price was: $59.99.$38.99Current price is: $38.99.Select options This product has multiple variants. The options may be chosen on the product pageQuick View -
All Products, All Swimwear, Bestselling Items, One Piece Swimsuits, Thong Bikinis | Micro Bikinis & String Bikinis Swimsuits
Micro Monokini G String Thong Hollow Out Bikini One Piece Swimsuit
Original price was: $73.99.$36.99Current price is: $36.99.Select options This product has multiple variants. The options may be chosen on the product pageQuick View -
All Products, All Swimwear, Bestselling Items, One Piece Swimsuits, Transparent See Through Fashion
Jetsetter Sexy See Through One Piece Swimsuit
Original price was: $65.99.$32.99Current price is: $32.99.Select options This product has multiple variants. The options may be chosen on the product pageQuick View -
All Products, All Swimwear, American Flag Bikinis & Swimwear Collection, Bestselling Items, Bikinis, Stars & Stripes Clothing Collection, String Bikinis
Summer Patriot American Flag Bikini Set
Original price was: $51.99.$24.99Current price is: $24.99.Select options This product has multiple variants. The options may be chosen on the product pageQuick View